Unleash Your Child’s Imagination: Transforming a KidKraft Playhouse with Creative DIY Ideas
Did you know that 80% of kids’ outdoor playtime happens in their backyards, with playgrounds, wooden playsets, and little playhouses?
Giving your wooden playhouses, like the KidKraft playhouse, a makeover can transform them into an exciting adventure zone with little playhouses, a backyard swing set, and green toys.
A fresh look sparks creativity with a sweet, modern outdoor playhouse and enhances the fun factor for your little ones through green toys and decor ideas in their playhouse.
Simple upgrades, such as new paint, added decorations, or a sweet modern outdoor playhouse, could make a world of difference in a little playhouse.

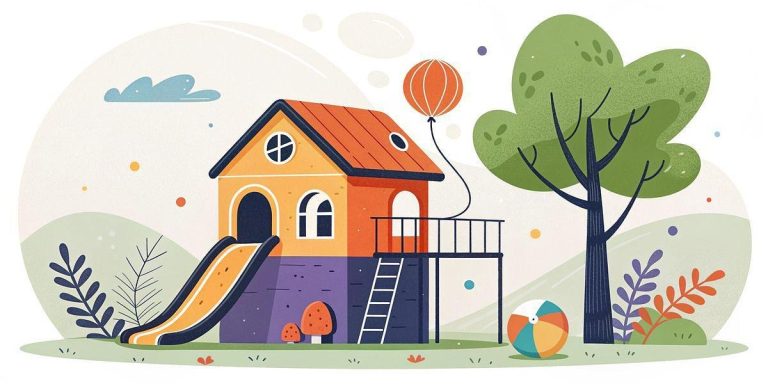
- BUILT FOR OUTDOORS: Made to withstand the weather, this wooden playhouse is pre-treated with a water-based stain that includes UV and mold protection to hold up against the elements.
- HOMEY TOUCHES: Fabric curtains, a mailbox and chalkboard help make this outdoor playhouse feel like a real home.
- COOK & SERVE MEALS: A BBQ grill has a click-and-turn knob and removable lid so kids can cook up food. Serve it to friends and family at the attached picnic table and benches.
- INDOOR SINK: Wash hands and play food at the pretend sink and faucet with moving lever.
- EASY ASSEMBLY: Make assembly easier with more help. Two people can set up this item in approximately 2.5 hours or less.
Last update on 2026-07-16 / Affiliate links / Images from Amazon Product Advertising API
This post will guide you through easy, budget-friendly ideas for revamping your playhouse.
With a few supplies and imagination, you can create a modern outdoor playhouse with decor ideas that your kids will love.
Get ready to unleash your creativity at home and make playtime even more special!
Key Ideas
- Choose a playhouse that fits your child’s interests and your outdoor space to ensure it will be loved and used.
- Before starting the house makeover, gather all the necessary tools and materials to play and create a smooth workflow.
- Unbox the playhouse parts and organize them by type to make assembly easier and faster.
- Always mask off areas in the house you don’t want to paint and apply primer for better paint adhesion and durability to play.
- Select a base paint color for your house that complements your yard, then play and add fun designs like stripes or stencils for a creative flair.
- To make the playhouse special for your child, personalize it with accessories such as curtains, signs, or toys.
Choose the Right Playhouse
Playhouse Models
Research various kids’ playhouse models to find one that fits your needs.
Many options exist, including modern playhouses and original playhouses.
Look for designs that offer durability and a fun aesthetic for the house to play in.
Popular brands often include features like weather-resistant materials.
These features ensure the playhouse lasts through different seasons.
Consider your child’s preferences when selecting a model.
Some kids love bright colors to play with, while others might prefer a more natural look for their house.
A green playhouse can blend into the yard nicely. It also encourages imaginative play in a scenic view setting, like a house.
Space Considerations
When choosing a playhouse, consider ceiling height and space for pretend play.
Ensure enough room for your child to play, stand, and move around comfortably.
A cramped space can limit creativity and enjoyment.
Measure the area where you plan to place the playhouse.
You want to ensure it fits well within your yard or garden for the house to play.
This helps avoid any surprises during installation.
An ideal spot, like a house, should also allow for easy access and safety to play.
User Reviews
Reading reviews is essential before making a purchase.
Positive feedback from other users can guide your decision. Look for comments about durability, ease of assembly, and overall satisfaction.
Parents appreciate playhouses that come with accessories or furniture.
Others highlight how their children enjoy food play inside their new playhouse.
Check if others mention their kids’ favorite playhouse design ideas, too.
Quality Toys
Quality toys enhance the experience of playing in the house.
Consider adding items like kitchen sets or tool kits to encourage role-playing activities.
These additions make the playhouse even more engaging.
Choose toys that are safe for toddlers and are made by reputable brands, such as green toy brands.
Safety should always be a priority when selecting toys for kids.
Personal Touches
Adding personal touches can make the playhouse feel special.
You might paint it in your child’s favorite color or add decorative items that reflect their interests.
Customization can create a unique environment that feels like home.
Involve your child in this process.
Let them choose colors or themes they love. This involvement increases their attachment to the space.
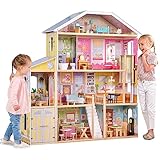
- Made of Wood: Crafted of premium wood construction and with a timeless, cheerful design with the intent to be passed down from kid to kid
- For Big Imaginations: Standing at four and half feet tall, this mansion provides an impressive 4 levels and 8 rooms for multiple kids to play without getting in each other’s way
- Hands-on Play: From moving the elevator up and down between floors to opening and closing the double garage doors, there’s plenty of role playing for kids to play with their 12-inch dolls (dolls not included)
- Fully Furnished: Includes 34 pieces of durable accessories so kids can make the house a home and redecorate over and over again
- Easy Assembly: Two people can set up this item in approximately 2 hours or less
Last update on 2026-07-16 / Affiliate links / Images from Amazon Product Advertising API
Prepare for the Makeover
Gather Materials
Before starting the makeover, collect all necessary materials, including brushes, primer, and paint.
Choose a high-quality primer like Kilz to ensure good coverage.
Select colors that fit your vision for the playhouse. You may also need tools like a ladder, sandpaper, and painter’s tape.
Check the playhouse model to know what specific items you will require. If you plan to add custom features, gather those materials too.
Having everything ready will make the process smoother.
Set a Timeline
Establishing a timeline is crucial for managing expectations.
Decide how long each step of the project will take.
For example, painting might take one day, while drying time could take another day or two.
Consider setting a deadline if you want the makeover finished by Christmas or another special occasion.
Mark key dates on a calendar to stay organized. This way, you can avoid last-minute rushes that may lead to regret.
Designate Workspace
Create a designated workspace for the makeover.
Choose a well-ventilated area to ensure safety while painting.
Open windows or use fans to circulate air.
Clear the area around the playhouse to prevent accidents and messes.
Cover nearby surfaces with drop cloths or old sheets to protect them from paint splatters.
A clean workspace makes it easier to focus on each process step.
Trim and Touch-ups
After preparing, pay attention to any trim or details that need extra care. Use smaller brushes for precise work around edges and corners.
This adds an extra layer of professionalism to your makeover.
After the first coat of paint dries, inspect the playhouse for areas needing touch-ups. Take your time during this stage; rushing can lead to uneven finishes.
Enjoy the Process
Lastly, enjoy the makeover process!
Transforming your kid’s Kraft playhouse should be fun and rewarding.
Involve your child in simple tasks like choosing colors or helping with small jobs.
This experience can create lasting memories together.
Celebrate small milestones throughout the project to keep spirits high.
Unbox and Organize Parts
Unboxing Process
Carefully unbox all components of the KidKraft playhouse.
This step is important to avoid damage. Open the box using a sharp tool, but be cautious not to cut through any parts.
After opening, lay out each piece on a clean surface.
This way, you can see everything.
Check for any visible damage. If something looks broken, contact customer service right away.
Sorting Parts
The parts are divided into categories for easier assembly later. Group items such as walls, roof pieces, and accessories separately.
This organization will save time when you start building.
Use small bins or containers to keep similar pieces together—for example, place screws and hardware in one container. Keep larger elements like walls and roof sections in another area.
This method helps prevent the loss of small parts and makes it easier to find what you need during assembly.
Reference Instruction Manual
Keep the instruction manual handy throughout the project.
The manual contains essential information about each assembly process step and includes diagrams showing how pieces fit together.
Refer to this guide often while working.
It can help clarify any confusion about specific parts or steps. Following the tutorial closely will ensure a smoother assembly experience.
If necessary, take notes on tricky steps or unique pieces.
This practice can help you remember important details later on.
Assembly Elements
Identify all the elements included in your KidKraft playhouse package. Look for standard items like windows and doors and fun accessories like mailboxes.
Knowing what you have will make planning easier.
Check if any additional tools are required for assembly. Most kits have basic hardware, but some might need extra tools like a screwdriver or hammer.
Gather these tools before starting.
Final Preparation
Please review everything before beginning the assembly process.
Make sure all parts are accounted for and sorted correctly.
This preparation will lead to a more enjoyable experience when giving your playhouse a makeover. By organizing your workspace and being aware of each component, you set yourself up for success.

- MADE OF WOOD & EASY ASSEMBLY: Kids’ play set made of premium, sustainable materials for long-lasting play. With simple-to-follow instructions and minimal tools, one person can set up this item in approximately 1 hour or less.
- 26 ACCESSORIES: Enjoy five-alarm fun with a furniture, a police motorcycle, fire truck, fire dog, helicopter bendable heroes and much more.
- FIREFIGHTER’S POLE: Floor-to-ceiling firefighter’s pole lets the heroes get ready to rescue in no time.
- PLAY & PUT AWAY: After playtime is over, store all pieces inside and close up for easy cleanup and a clutter-free area.
- FOR BIG PLAY: This open and close play set stands over 2 feet tall and features 3 levels and 12 rooms including a rooftop sports court and helipad, so multiple kids can play together.
Last update on 2026-07-16 / Affiliate links / Images from Amazon Product Advertising API
Mask and Prime Surfaces
Protect Areas
Use painter’s tape to cover parts you do not want to paint.
This step is essential for creating clean lines. The tape prevents the paint from bleeding onto unwanted surfaces.
Carefully press the tape down to ensure no gaps remain.
Once the taping is complete, examine your work. Check for any areas that might need extra protection.
This preparation helps avoid mistakes later in the project.
Apply Primer
Next, primer is applied to all surfaces of the playhouse. Primer enhances paint adhesion and durability. It creates a better base for your chosen paint color.
Use a brush or roller for even coverage.
Make sure to coat every surface, including corners and edges.
Choose a primer suitable for outdoor use.
This ensures that it withstands weather conditions. Follow the manufacturer’s instructions for application details.
Dry Completely
After applying the primer, allow it to dry completely before proceeding.
Drying times vary depending on humidity and temperature.
Typically, primers require about 1-2 hours to dry. However, check the label for specific drying times.
Ensure the environment is well-ventilated during this phase.
Good airflow helps the primer cure properly. Avoid rushing this step; it’s crucial for achieving a smooth finish later.
Apply Base Paint Color
Choose Exterior Paint
Selecting the right exterior paint is crucial. High-quality paint can withstand harsh weather conditions. Look for options that resist fading and peeling.
Brands like Behr Premium Plus Paint offer durability and a variety of colors. This choice ensures that your playhouse will look good for years.
Start with White Trim
Begin your painting project with a base coat of white. Use this color for all trim pieces.
It creates a clean contrast against darker colors and white highlights details like windows and doors.
This simple step enhances the overall appearance of the playhouse.
Apply Main Color
After the trim dries, apply the main color. Choose a shade that fits your child’s personality or the home’s exterior.
Navy blue is a popular choice for its classic look.
Use a roller or brush to apply it evenly across the playhouse.
Ensure every surface gets an even coat for a polished finish.
Painting Tips
Keep these tips in mind while painting:
- Work in sections to avoid uneven coverage.
- Use painter’s tape to protect areas you don’t want to paint.
- Allow each coat to dry completely before adding another layer.
These steps will help achieve a professional look.
Final Touches
Once the main color is dry, inspect for any missed spots. Touch up these areas as needed.
Consider adding fun elements like colorful accents or stencils.
These details can make the playhouse unique and inviting.
Add Creative Design Touches
Unique Accessories
Incorporate unique design elements into your KidKraft playhouse. Spray-painted accessories can add a pop of color and flair.
Use metallic gold or bright hues to make items stand out. For example, consider spray painting flower pots or small furniture pieces.
This simple update can transform the look of the entire space.
Experiment with different shapes and sizes for accessories. A mix of large and small items creates visual interest. Look for inspiration on websites like Pinterest.
You can find countless decor ideas that will help you visualize your project.
Color Combinations
Color combinations play a vital role in personalizing the playhouse. Choose colors that reflect your child’s personality.
Soft pastels can create a calming environment, while bold colors add energy.
Combine two or three colors for a cohesive look—for instance, pair light blue with sunny yellow for a cheerful vibe.
Alternatively, try a classic combination of white and navy for a modern touch.
Patterns also enhance the overall design.
Stripes or polka dots can be painted on walls or furniture, making spaces feel more dynamic and fun.
Fun Features
Adding fun features can enhance the playhouse’s charm. Consider window boxes filled with flowers or herbs.
They bring life to the exterior and encourage kids to learn about plants.
Decorative shutters are another great addition. They create a whimsical feel and provide visual interest.
Paint them in contrasting colors to make them pop against the walls.
Think about adding a chalkboard wall inside the playhouse. Kids love drawing and writing messages, making it an engaging feature.
Decorative Life
Integrate elements of decorative life into your design. For example, use old toys or books as decor around the playhouse.
These items tell stories and spark children’s creativity.
Hang artwork created by your child on the walls. This personal touch makes the space feel special and inviting.
Consider adding fairy lights or lanterns for soft lighting in the evening.
This creates a cozy atmosphere for nighttime adventures.
Inspiration Sources
Find inspiration from various sources to guide your makeover process.
Websites often showcase modern decor ideas specifically for playhouses. Use affiliate links to purchase new pieces easily.
Check online forums for comments and suggestions from other parents who have completed similar projects.
Their experiences may provide valuable insights into what works best.
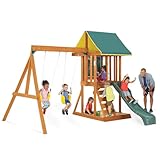
- BUILT FOR OUTDOORS: Made to withstand the weather, this wooden backyard set is pre-treated with a water-based stain that includes UV and mold protection to hold up against the elements.
- ASSEMBLY WITH A FRIEND: Make assembly easier with more help! Two people can set up this item in approximately 4-8 hours.
- CHALK WALL: Sketch a treasure map, practice writing letters or numbers or write out the menu for the day. The chalk wall helps bring imaginative play to life.
- SHADED AREA: The upper deck is a landing spot for deciding where to visit next is also a cool break from active play, thanks to the tarp canopy.
- ACTIVE & IMAGINATIVE PLAY: Exercise muscles with the rock wall, slide and swings. Or, enjoy role playing in the below area that would make an ideal sandbox (sand not included).
Last update on 2026-07-16 / Affiliate links / Images from Amazon Product Advertising API
Assemble the Playhouse
Gather Materials
Start by collecting all the necessary parts. Check the instruction manual for a complete list of components.
This list typically includes walls, roofs, and floors. Ensure you have screws, nails, and any tools required for assembly.
Ask for help from a friend or family member. Working together makes handling larger pieces easier and speeds up the process.
A second set of hands can assist in holding parts while you secure them.
Follow Instructions
Carefully read the assembly instructions step-by-step. Each section will guide you through connecting the playhouse parts correctly.
Begin with the base and work your way up.
Secure the floor first to provide a solid foundation. Attach the walls next, ensuring they align properly. Use a level to make sure everything is straight.
Misalignment can lead to problems later on.
Secure Fastenings
Once all parts are assembled, double-check each connection. Ensure that screws and nails are tight. Loose components can cause safety issues during playtime.
Inspect the corners and joints closely. These areas bear most of the weight when children play inside the cute playhouse.
Make sure everything is secure and stable.
Inspect for Safety
After assembly, examine the entire structure for safety concerns. Look for sharp edges or protruding screws that could harm children.
Sand down any rough spots if needed.
Check that doors and windows open easily and close securely. This ensures kids can enter and exit without difficulty.
Safety should always come first in any outdoor playhouse.
Clean Up
Once you finish assembling, clean up your workspace. Remove any leftover packaging materials and tools from the area.
Keeping a tidy space helps prevent accidents.
Consider thoroughly cleaning your dirty playhouse after assembly.
Wipe down surfaces to remove dust or debris accumulated during construction.
Add Final Touches
Finally, personalize your new modern outdoor playhouse with decorations or furniture.
Choose items that match your child’s interests to make it feel like home.
You might add a small table, chairs, or even some outdoor toys for extra fun.
Encourage creativity by letting your child help decorate their space.
Personalize with Accessories
Custom Accessories
Select custom accessories that reflect your child’s personality. Kids love to express themselves. Pick items that align with their interests.
For example, if they enjoy gardening, consider adding small planters or decorative pots. If they like animals, choose animal-themed decor.
These pieces can make the playhouse feel more personal and inviting.
Decorative Items
Add decorative items to enhance the playhouse’s charm. A simple wreath on the door can create a warm welcome.
Consider attaching a house number to the front. This small detail adds a sense of ownership.
You can also hang colorful curtains inside the windows. They provide privacy while adding color and style.
Functional Accessories
Include functional accessories for added fun during playtime.
A brass dinner bell can be a great addition. Kids can ring it to call friends for meals or playtime activities.
It encourages imaginative scenarios, like hosting a tea party or a restaurant game.
Other options include small tables or chairs that match the playhouse theme.
Stock Items
Stock up on essential items that boost creativity. If needed, paint the walls to add color. A gallon of white exterior paint can give a fresh look.
Choose vibrant colors for accents, like doors or window frames. These touches will make the playhouse stand out in the yard.

- WEB SWING: It’s a playhouse and swing set in one with the addition of the attached web swing. This sturdy spider-like rope swing attaches to the wood beam jutting from the playhouse.
- PLENTY OF PLAY: Enter the scalloped half door with magnetic closure to role play house. The outside of the wooden house has a graphic fabric wall for extended storytelling. House can accommodate up to five kids, ages 3 to 7.
- INDOOR KITCHEN: Play kitchen includes sink, faucet and burner with fire-inspired graphics. Kids can turn the knobs for realistic role playing. Also includes three accessories: pot, pan and spatula that conveniently store on the hanging pegs.
- BUILT FOR OUTDOORS: Made to withstand the weather, this wooden backyard set is pre-treated with a water-based stain that includes UV and mold protection to hold up against the elements.
- EASY-TO-FOLLOW ASSEMBLY INSTRUCTIONS: Download the free BILT App from the Apple App Store or Google Play for digital and 3D assembly instructions to make setup and installation easy to follow. Average assembly time is 1.5 to 2.5 hours.
Last update on 2026-07-16 / Affiliate links / Images from Amazon Product Advertising API
Name Your Playhouse
Naming the playhouse adds a special touch. Kids can feel more connected when they have a name for their space.
Write it on a sign and hang it above the door.
This makes it feel like their very own home away from home.
Backyard Integration
Integrate the playhouse into your backyard landscape.
Surround it with flowers or shrubs for an inviting atmosphere.
You can also place stepping stones leading to the entrance, creating a magical and welcoming path.
Email Ideas
Get ideas from others by sending an email to friends or family. Ask for suggestions on accessories or decorations they used in their children’s playhouses.
Sharing experiences can spark new ideas for your project.
KidKraft Playhouse Summary
Giving your KidKraft playhouse a makeover transforms it into a personalized paradise for your kids.
You’ve learned how to choose the right playhouse, prepare for the makeover, and add those creative touches that make it uniquely yours.
Each step is vital in creating a space where imagination thrives.
Now, it’s time to unleash your creativity!
Dive into the makeover process and watch your child’s joy as they explore their newly designed playhouse.
Don’t forget to share your results and inspire others. Your efforts will beautify the playhouse and create memories that last a lifetime.
Get started today!
KidKraft Playhouse Frequently Asked Questions
How can I choose the right KidKraft playhouse for my child?
Consider your child’s age, interests, and available space. Look for features like slides, kitchens, or themed designs to engage them.
What materials do I need to prepare for a makeover?
Gather paint, brushes, masking tape, primer, and any decorative elements you wish to add. Ensure you have tools like screwdrivers and safety gear.
How do I organize parts after unboxing?
t parts by category—walls, roofs, accessories—to streamline assembly. Keep instructions handy for reference.
Why is priming surfaces important before painting?
Priming ensures better paint adhesion and durability. It also enhances the color vibrancy of your chosen base paint.
What type of paint should I use on a playhouse?
Use outdoor acrylic paint for durability and weather resistance. Choose non-toxic options to ensure the safety of children.
How can I personalize my playhouse effectively?
Add unique touches like custom signage, themed decorations, or your child’s name. Use stickers or stencils for easy application.
What accessories are best for enhancing playtime?
Consider adding furniture sets, gardening tools, or art supplies. These items enrich imaginative play and keep children engaged longer.